A Beginner’s Guide to Understanding Compression in Music
What Is Compression and Why Does It Matter? If you’re new to […]
The post A Beginner’s Guide to Understanding Compression in Music appeared first on pointblank Music School’s Blog.
Humble Bundle has launched a new promotion on a bundle of audio plugins and sound packs for music producers. Music Producer 2023: Plugins & Software... The post Music Producer 2023: Plugins & Software Essentials at Humble Bundle appeared firs...
https://plus.pointblankmusicschool.com/
What Is Compression and Why Does It Matter?
If you’re new to music production, chances are you’ve come across the term compression, and maybe even dropped a compressor onto a track without fully knowing what it does. You’re not alone. Compression is one of the most important tools in modern mixing, but it’s also one of the most misunderstood by beginners.
At its core, compression helps control the dynamic range of audio – that’s the difference between the quietest and loudest parts of a sound. By taming peaks and boosting quieter elements, compression makes your mix sound tighter, smoother, and more professional.
But like any powerful effect, using compression without understanding it can do more harm than good. That’s why this guide breaks down the basics in plain English, no engineering degree required. You’ll learn what compression is, when to use it, how the main controls work, and how to apply it confidently in your own productions.
What Is Compression in Music?
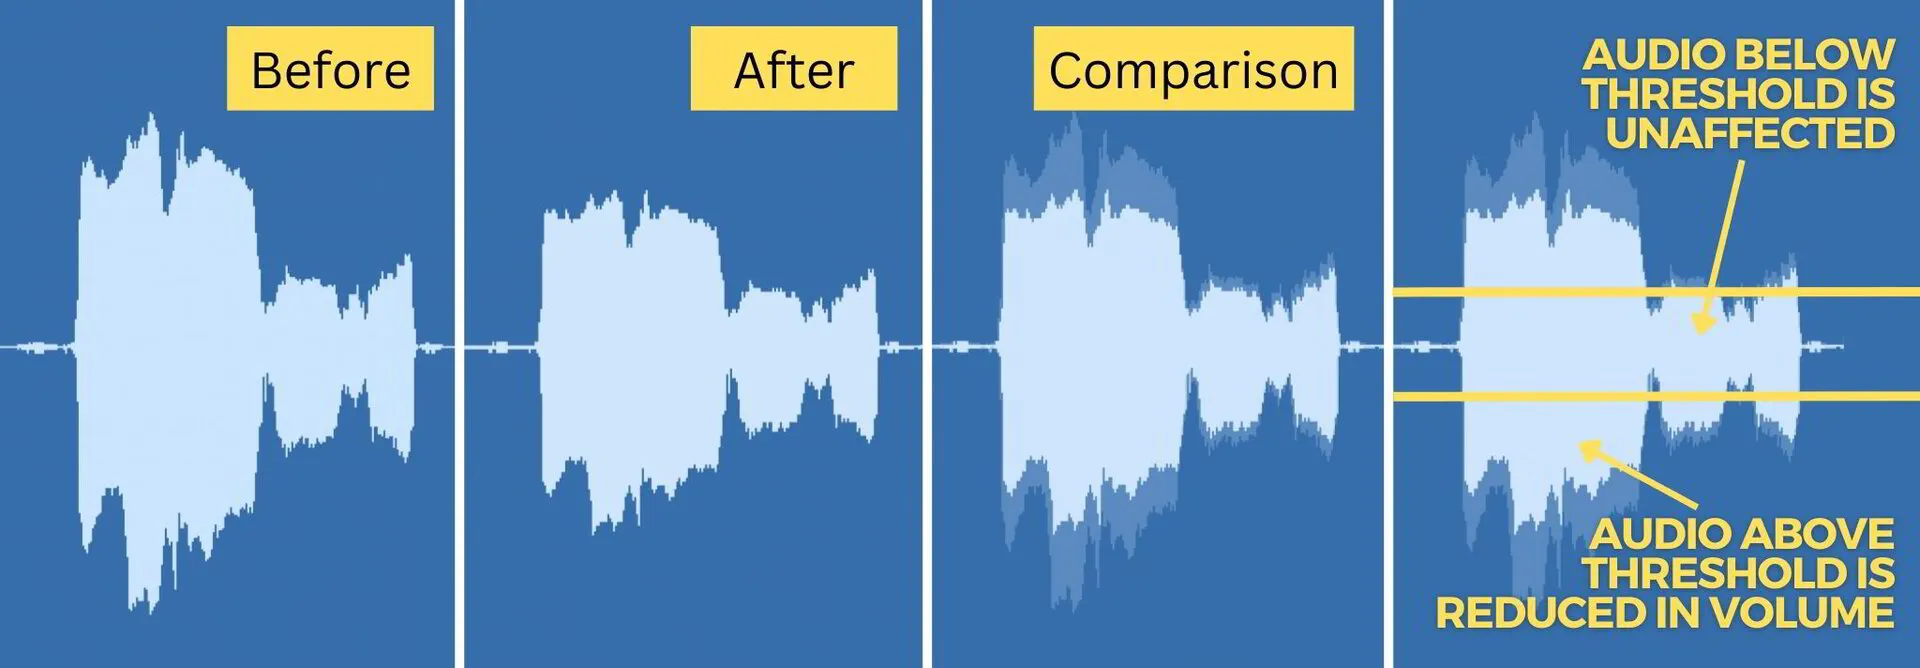
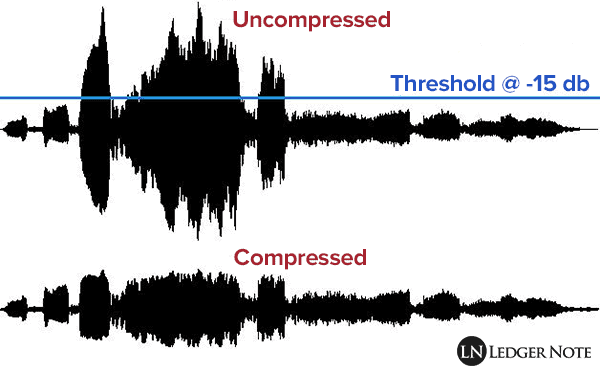
Compression in music production is the process of controlling the volume levels of an audio signal to make it more consistent. It reduces the loudest parts of a sound and brings up the quieter parts, helping everything sit more smoothly in the mix.
In simple terms:
A compressor listens to your audio, turns down the loud bits, and boosts the quieter ones – so everything feels more balanced and polished.
This is especially useful when working with vocals, drums, bass, or any instrument that naturally fluctuates in volume. Without compression, you might find that a vocal jumps out too much in one section and gets lost in another. With it, you can create a more even and controlled performance.
What Is “Dynamic Range”?
Dynamic range refers to the difference between the quietest and loudest parts of a sound or track. Compression narrows that range, which helps:
- Make vocals easier to hear over a beat
- Add punch and clarity to drums
- Ensure your track sounds good on all kinds of speakers
pointblank Tip: Compression isn’t about making everything loud, it’s about controlling dynamics so you have more creative control over how your track feels.
What Are the Main Compressor Settings?
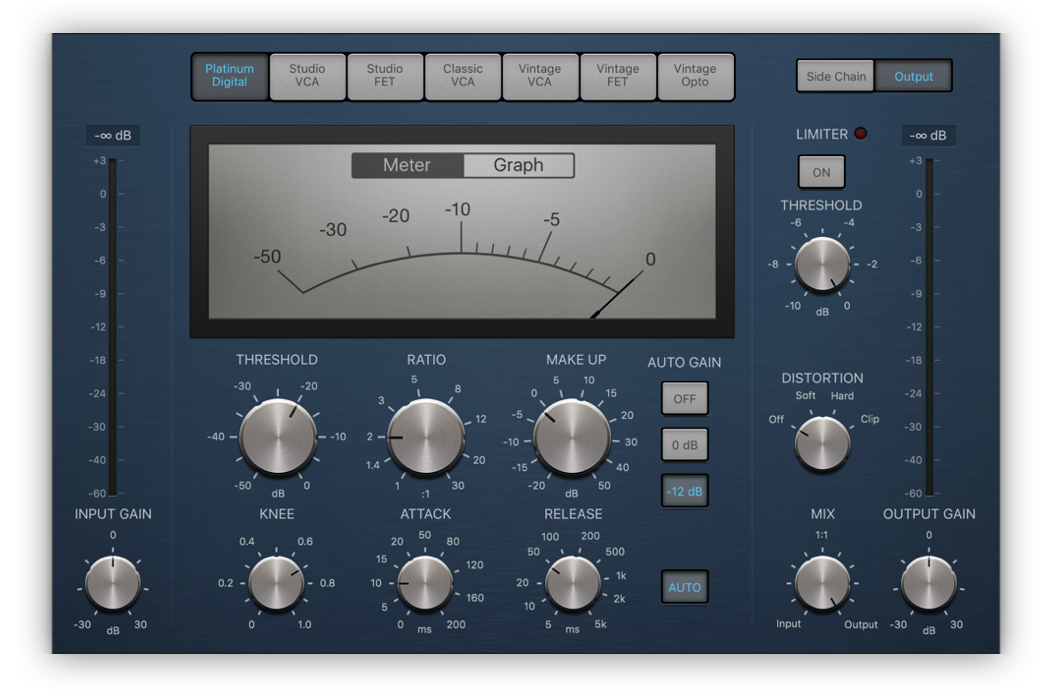
At first glance, compressor plugins can look intimidating with knobs and metres that don’t seem very intuitive. But once you understand what each setting does, it becomes much easier to use compression effectively.
Here’s a breakdown of the key controls you’ll find on most compressors:
Threshold
The level at which the compressor starts working.
- When your audio goes above this level, compression kicks in.
- Set it lower to compress more of the signal, or higher to only affect the peaks.
Think of it as: “When should the compressor take action?”
Ratio
How much the compressor reduces the volume after the signal passes the threshold.
- A ratio of 2:1 means that for every 2 dB over the threshold, only 1 dB comes out.
- Higher ratios (e.g. 10:1 or more) are more aggressive.
Think of it as: “How strong should the compression be?”
Attack
How quickly the compressor responds once the signal exceeds the threshold.
- Fast attack = more control but can squash transients (great for vocals).
- Slow attack = lets transients through, which keeps drums punchy.
Think of it as: “How quickly should the compressor clamp down?”
Release
How long it takes for the compressor to stop working after the signal drops below the threshold.
- Fast release = more natural and transparent
- Slow release = smoother but can sound more noticeable
Think of it as: “How long should the compressor keep compressing?”
Makeup Gain (or Output Gain)
Since compression lowers the overall volume, you use makeup gain to bring the signal back up.
- Helps maintain proper loudness in your mix
- Use metres and ears to match the before/after levels
Think of it as: “Boost the signal back to where it needs to be.”
pointblank Tip: Don’t just turn knobs, listen to what each one does. Solo a vocal or drum loop and experiment with settings to hear how compression changes the shape and feel of the sound.

When (and Why) to Use Compression
Knowing when to use compression is just as important as knowing how. Compression isn’t a one-size-fits-all effect, it has different purposes depending on the instrument, genre, and what you’re trying to achieve in your mix.
Here are the most common reasons producers reach for a compressor:
To Control Dynamic Performances
Vocals often vary in volume, some lines are loud, and others are barely audible. Compression smooths those differences out, so the performance feels more consistent without losing emotion.
To Add Punch and Energy
On drums, a carefully set compressor can make kicks hit harder and snares snap more aggressively. It shapes the transient (attack) of the sound, helping drums cut through a busy mix.
To Help Sounds Sit Better in the Mix
Sometimes a bassline or pad will disappear behind other elements, even if it’s loud enough. Compression can help these sounds hold their place in the mix more clearly by evening out their dynamics.
To “Glue” the Mix Together
On a mix bus or drum group, gentle compression helps blend elements together – making your mix sound more unified and polished. This is sometimes called bus compression or glue compression.
To Create Movement or Rhythm (Sidechain Compression)
Sidechain compression is often used in electronic music to make the kick drum “duck” other elements like pads or bass. This creates that familiar pulsing effect you hear in house, EDM, and lo-fi beats.
pointblank Tip: Compression should always have a purpose. Ask yourself: Am I trying to smooth a performance? Add punch? Create space? If you’re not sure, try bypassing the compressor — if it sounds better without it, you might not need it yet.
Compression in Action: Examples
Understanding the compression conceptually is one thing, but hearing it in real-world situations is where it really clicks. Let’s break down how compression is commonly used in different elements of a track:
Vocals: Smoothing Out the Performance
Vocals often have inconsistent volume — one word might be too quiet, another too loud.
- Goal: Keep the vocal present and balanced without sounding flat.
- Settings to try: Medium attack (5–10ms), medium release (50–100ms), 2:1 to 4:1 ratio.
Result: A more controlled and polished vocal that stays up front in the mix without peaking.
Drums: Adding Punch and Presence
On kick and snare, compression tightens the sound and makes it more impactful.
- Goal: Enhance attack and bring out the energy.
- Settings to try: Slow attack (15–30ms), fast release (50ms or lower), higher ratio (4:1–6:1).
Result: A punchier, more aggressive drum sound that cuts through the mix.
Bass: Keeping Low End Consistent
Basslines can have wild volume swings, especially if they’re played live.
- Goal: Keep the low end stable and even.
- Settings to try: Fast to medium attack and release, 3:1 ratio.
Result: A tighter, more stable low end that locks in with the kick drum.
Mix Bus: Gluing the Track Together
Subtle compression on your master or group channels can bring your whole track together.
- Goal: Add cohesion without squashing dynamics.
- Settings to try: Very low ratio (1.5:1–2:1), slow attack, fast release, just 1–2 dB of gain reduction.
Result: A more professional-sounding mix where all elements feel like they belong together.
Sidechain Compression: Creating Movement
Especially in electronic music, sidechaining the kick to other instruments creates that rhythmic pumping effect.
- Goal: Add groove, energy, and space for the kick.
- Settings to try: Use a fast attack and release, and dial in the threshold until the pumping feels right.
Result: A dynamic, modern sound with clear kick presence.
pointblank Tip: Don’t just apply presets — try these settings on your own tracks and tweak them by ear. Every mix is different, and your ears are your best tool.
Common Mistakes Beginners Make with Compression
Compression can work wonders, but only if you use it wisely. Many new producers make the same few mistakes when learning how to use a compressor and understanding them early can save you a lot of frustration.
Here are the most common pitfalls to avoid:
- Over-Compressing Everything
Cranking the ratio or dropping the threshold too low can squash your audio, removing all the natural dynamics.
Result: A lifeless, flat mix that lacks energy and movement.
Fix: Use compression with a light touch, especially on vocals and instruments that need to breathe.
- Ignoring Attack and Release Settings
Beginners often leave the attack and release on default settings or don’t know what they’re doing. But these two controls are crucial to shaping the sound.
Fix:
- Use a slower attack to let transients through (good for drums).
- Use a faster release to recover quickly and stay transparent.
- Compressing Just Because
Not every sound needs compression. If something already sounds great, don’t compress it “just because you’re supposed to.”
Fix: Compress with intention. Ask: Is this helping the mix? If not, skip it.
- Not Using Makeup Gain
After compression, the signal is often quieter. If you forget to adjust the output or makeup gain, your compressed track might sound worse simply because it’s quieter.
Fix: Match the volume before and after compression so you can judge its effect fairly.
- Judging in Solo
Compression might sound nice when a track is soloed, but always listen in context. What sounds great on its own might clash or disappear in the full mix.
Fix: Make adjustments while listening to the full arrangement.
pointblank Tip: One of the best ways to learn compression is to make mistakes — but do it consciously. Apply too much, too little, and experiment. That’s how your ears get trained.
Tips for Learning Compression by Ear
Compression can be a bit abstract at first — you don’t always see the impact like with EQ or volume changes. That’s why developing your ear is key. The more you train yourself to hear what compression is doing, the more confidently you’ll use it.
Here are some practical tips to help:
- Use A/B Comparison
Before/after listening is one of the best ways to hear what’s really happening.
- Turn the compressor on and off.
- Match output levels so volume doesn’t trick your ears.
Ask yourself: Does it sound tighter? Smoother? More controlled?
- Start with Extreme Settings (for Learning)
To hear what each control does, temporarily dial in extreme settings:
- Try a high ratio, low threshold, slow attack, fast release.
- Listen to how it changes the shape of the sound. Then dial it back to more subtle, usable levels.
- Solo Specific Elements
Practice compressing just vocals or just drums. Focus on how compression affects the transients (attacks) and body of the sound.
- Use Presets — Then Tweak
Presets can be useful learning tools if you treat them as a starting point, not a one-click solution.
Try this: Load a preset, then adjust each setting and listen to what changes.
- Trust Your Ears Over the Metres
The metres show gain reduction, but what really matters is how the track feels in the mix. Let your ears guide your decisions, not just numbers on a screen.
pointblank Tip: Many of our students learn compression faster by using it creatively, not just technically. Compression can shape sound, control energy, and even build emotion when used with intention.
Compression Doesn’t Have to Be Complicated
Compression is one of the most powerful tools in music production, and once you understand how it works, it opens up a whole new level of control over your sound. From smoothing out vocals to adding punch to drums or glue to an entire mix, learning how to use compression properly is a game-changer for beginner producers.
The key is to practice, experiment, and train your ears to hear the subtle differences. You don’t need to master every technical detail overnight; just start with the basics, build your confidence, and focus on how compression feels in your tracks.

Inspired?
Join a course at pointblank Music School and get hands-on training in compression, mixing, and every essential music production skill — taught by industry professionals, in world-class studios or fully online. Thanks to the dedication of our industry expert instructors, pointblank has earned a prestigious Gold rating in the Teaching Excellence Framework (TEF), placing us among the very best institutions. Whether you’re passionate about DJing, music production, sound engineering, vocal performance, software engineering, radio or songwriting – pointblank offers degrees or short courses in London, LA, Ibiza, and Online. No matter your location or aspirations, we are here to help make your dreams a reality.
Register to Access Free Courses, Plugins, Projects, Samples & More
Register below and visit our Free Stuff page to get your hands on a range of free courses, exclusive music-making tools and tutorials provided by the team.
The post A Beginner’s Guide to Understanding Compression in Music appeared first on pointblank Music School's Blog.
This is a syndicated post. To read more, click the source link above.

