
How to recreate “Un Coco” by Bad Bunny using Cymatics Samples
Discover how Bad Bunny leveraged Crystal Guitar Loops Vol 2 to create his “Un Coco” hit song from his latest album “Un Verano Sin Ti”.

https://cymatics.fm/blogs/production
Are you looking for that Bad Bunny Cymatics guitar vibe or fresh loops for your next project?
As of 2023, Bad Bunny is likely a familiar name to you, thanks to his multiple chart-topping hits and global presence.
"Un Coco" is a song that weaves together lo-fi guitars with a steady, slow-tempo reggaeton beat and bass.
The lyrics, raw and filled with heartbreak and hopelessness, take the spotlight, capturing all the emotional ups and downs, while the music serves as a comforting, contemplative backdrop.
And if you're looking for more live guitar loops with a similar vibe, you're in the right place.
Crystal Guitar Loops Vol 2
The "Un Coco" Bicycle Guitar Loop originates from this Cymatics sample pack.
Crystal Guitar Loops Vol 2 has a myriad of guitar styles to play with, all perfect for making an industry ready guitar based song just like Un Coco.
Live instruments such as guitars will always bring an authentic feel to your music, and bringing authenticity to the table was our goal when we put this pack together.
This pack includes 35 unique melody loops with individual stems.
How To Recreate "Un Coco"
Curious about how this beat comes together? Keep reading to find out!
Without holding back any longer, let’s jump right in. This is what we'll be recreating from scratch.
This is what you’ll need:
- Titan Beta Pack [FREE Download]
- Crystal Guitar Loops Vol 2 [$5]
- DAW
Table of contents:
This time around, we'll be working with audio drums and Ableton Live. However, if you feel more comfortable using a Drum Rack and working with MIDI then go ahead and work that way.
Also, if you’re not an Ableton Live user, worry not. This will work with any DAW, you just have to follow along.
Step 1: Guitar Chord Progression
The guitar chord progression is the second most important element in this song, since the vocals are naturally meant to be the center of attention.
Start by setting your project file at 152 BPM and then head over to your Crystal Guitar Loops Vol 2 folder, then to the Stems subfolder and grab Layer 1 from:
Cymatics - Bicycle Guitar Loop - 76 BPM G# Min
Proceed to drag it to an audio track and simply make an 8 bar loop.

That’s it for the verse section; for the main chorus, we’ll simply switch to Layer 2 from the Bicycle stems.
Step 2: Verse Beat Pattern
This is an overall view of what 4 bars of the verse beat pattern looks like.

We'll also get a little bit creative in this section, showcasing some additional production techniques worth knowing. Let's start with the kick drum!
Browse through your Titan Beta pack, and reach out for the Hitter kick drum (74.3 Hz D1).
In the span of 4 bars, start by replicating the following kick drum pattern:

Keep an eye on the grid at the top of the image to better determine where each hit should be placed.
Remember, if it better suits your workflow, you can also use a drum rack instead of audio samples. By loading them into the device, you’ll be able to easily recreate the beat pattern.
We now have four bars of this simple kick pattern, so, go ahead and duplicate it to turn it into an 8 bar loop. Also, adjust the channel volume to -2 dB.
For the next step, whether you're using audio samples or a drum rack, tweak the envelope of the kick drum by adding a little fade at the end of the sample. If you're using a drum rack, you can achieve this by tweaking the ADSR knobs on the sampler controls.
The kick drum length should be a 1/16th note, or approximately 100 ms at 152 BPM.
In this way, we’ll start shaping our kick drum to sound like the original record.
Now, let’s explore a non conventional way to get our kick drum in tune with the one used in Un Coco.
Head to your browser, navigate to the audio effects, and load a pitch shifter. Then, proceed to click on the “Frequency” mode of the audio effect.
The kick drum of the original record sits at the note F1 (43.65 Hz), so, find the fine-tune knob of the pitch shifter and set it at approximately -26.2 Hz.

This is another alternative to change the pitch of your kick drum—or any sample in that regard—without using the traditional semi-tone knob and stretching algorithms.
Let’s move along and set up the snare pattern.
Head over to your file browser and fetch the following snare sample from the Titan Beta Pack:
Cymatics - Reduction Snare - E
Make a 1 bar loop, put the snare at the 3rd beat of the bar (half time), and spread the pattern across your 8 bar loop. It should look like this:

Set the channel volume to -7.5 dB, and we’re nearly done; now, let’s work on the hi-hat pattern.
Head once again to the file browser and fetch the following sample from the Titan Beta pack:
Cymatics - Hi-hat (Darts)
The hi-hat pattern in Un Coco plays on every single strong beat of every bar. The pattern looks as follows:

Since this is a 1 bar loop pattern, just fill the rest of the overarching 8 bar loop. Set the channel volume to -7.7 dB.
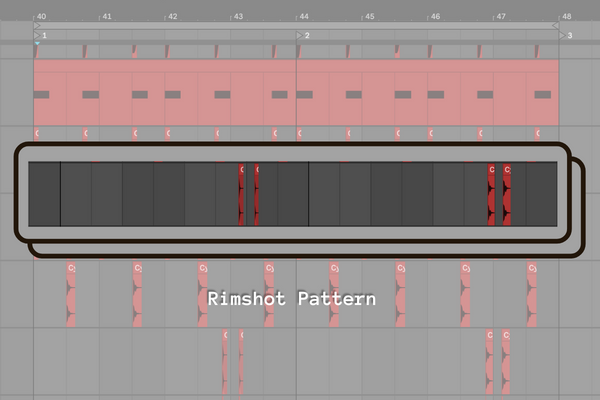
Lastly, from the Titan Beta pack, get the Cymatics - Rimshot (Crush) sample. The following percussion pattern is a basic fill that plays near the end of every 4 bars. Set the channel volume to -11.7 dB.
That’s it for the verse drum beat!
Step 2: Chorus Beat Pattern
The chorus section does a few pattern variations while also adding a bass. For the sake of simplicity, you’ll need:
From the Titan Beta Pack:- Cymatics - Snare (Bat)
- Cymatics - Hihat (NoJoke)
- Cymatics - Clap (Pro)
- Cymatics - BASS Label
- Ableton Stock 808 Snare
This is an overall view of what 4 bars of the chorus beat pattern look like. Remember, we just need 4 bars to then duplicate that pattern and make it 8 bars long.

- The kick drum plays on the first and third beat of each bar.
- The hihat plays on every 1/4th note layered with our previous hihat; make sure to accent with velocity every strong beat (1&3).
- The snare pattern plays on the second 1/8th note of the second beat, and the fourth beat of each bar.
- The clap gets layered on top of the snare, on the 4th beat of each bar as an accent.
- Every 2 bars, on the last beat of the last bar, a pitched 808 Tom gets layered with the clap and snare.
Adjust the channel volume of the newly added samples accordingly.
Step 3: Bass Pattern
Load a new MIDI track and fire up a sampler with the BASS one shot from the Titan Beta pack.
This is what the 8 bar loop looks like. From a theoretical standpoint, we could assume that this is in B major.

Nothing crazy going on over here. Let’s just finalize this by tweaking the filter setting to give your bass some extra beef and lowering the channel volume by -8.5 dB.
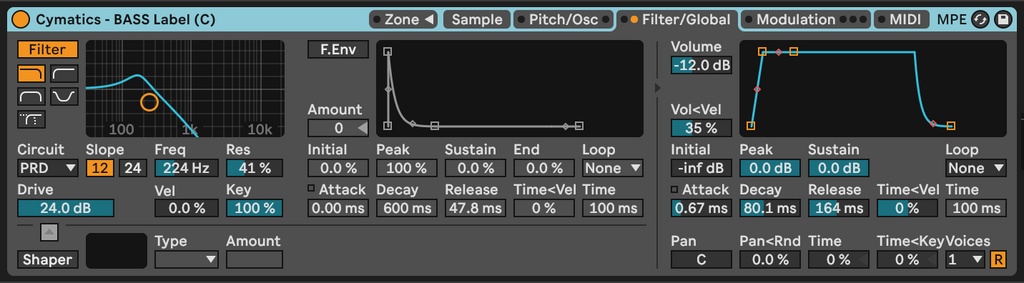
Set up the cutoff frequency of a high cut filter at 224 Hz. Bump the resonance to around 40% and add maximum drive with the PRD circuit.
Set the envelope release time to around 164 ~ ms, and that should be it.
Step 4: Mixing and Processing
Now, let’s give our little arrangement some processing to polish its sound. Don’t worry if the settings aren’t exactly the same, we just spent some time fine tuning the parameters to polish the end result.
1. GUITAR: From the browser, navigate to your audio effects and load an EQ8 and a glue compressor into the audio track.Within EQ8, set up the following parameters:
- Low pass filter @ 250 Hz with a wide Q setting.
- Bell Filter @ 415 Hz with -4.29 dB gain reduction with a medium Q setting.
- Bell Filter @ 1.19 kHz with 5.33 dB gain and wide Q setting.
Lastly, sidechain subtly the guitar track with your kick drum:
- 10 ms attack
- 1.2 release
- 2:1 ratio and aim for a ~ 5 gain reduction.

Within the EQ8, set up the following parameters:
- X4 High pass filter @ 20 Hz with a wide resonance (Q) setting.
- X4 Low pass filter @ 5.40 kHz with a wide Q setting.
- Bell Filter @ 166 Hz with -6.67 dB gain reduction with a medium Q setting.
- Bell Filter @ 271 Hz with -5.24 dB gain reduction with a wide Q setting.
- Bell Filter @ 43.7 Hz with 2.00 dB gain and a surgical Q setting emphasizing F1.
Let’s finalize the kick drum by tweaking the glue compressor’s settings. Simply copy them from the image below. It should look something like this:


This hihat has minimal processing, just some EQ rebalancing and the same reverb for coherency. Our main goal here is ensuring it doesn’t interfere with our base hihat. With DARTS shaping the “body” of your hat, this adjustment is primarily for added textural variation.

Lastly, we’d like to share that one of the secrets to a tight groove lies in the details. Add simple audio fades to snares, hats, claps, and the tom drum, keeping them tight will make a huge difference.
It's also worth noting that both of our snares, Reduction & Bat, don't need any processing, since they already sound amazing as they are.
Just ensure anything below 90 Hz is removed to keep the low end tidy.
5. BASS SIDECHAIN:Last but not least, make sure to sidechain your bass to the kick drum.
You can go ahead and copy the guitar’s glue compressor and use it on the bass channel as well. We’ll do some minor tweaks since this sidechaining needs to be stronger.
- 10 ms attack
- 0.4 release
- 10:1 ratio and aim for a ~ 5 gain reduction.
That’s it for this guide. In the final arrangement, we did some simple but extra layering that added texture to certain elements of the beat.
Just to give you a sneak peak, we did a really nifty kick transient layer to increase how the kick cuts through the mix. The project file is available for download, so we really encourage you to check it out and analyze it further.
Conclusion
To finalize this entry, let’s extract some of the most valuable insights from this beat recreation project.
- Don't forget to check out Crystal Guitar Loops Vol 2.
- The beat has to be simple and punchy when it’s a vocal centered track.
- In this music genre, it’s generally a good idea making sure that your groove is dialed-in and tight.
- Keep your low end clean, and don’t forget to sidechain.
- You can also pitch any element in your song with a frequency shifter.
- Trust your ears and develop your own taste.
- Use bus processing to glue together multiple elements.
This is a syndicated post. To read more, click the source link above.


